Getting a new baseball glove is an exciting moment for any player. However, before you can take that shiny new glove out on the field, you must break it in properly. Breaking in a baseball glove is essential to shaping the pocket and softening the leather. With a properly broken-in glove, you’ll be fielding ground balls and quickly catching fly balls.
If you’re wondering how to break in a baseball glove, this guide will walk you through how to break in a baseball glove. We’ll cover the fundamental principles of breaking in a glove and techniques, products, and tips to help you get game-ready fast. Let’s dive in!
Why Breaking In a Glove Is Important
The leather is stiff and unforgiving when you first get a new glove. Trying to catch or field a ball with a stiff glove can sting your hand and cause the ball to bounce out. The break-in process softens the leather, creating a natural pocket shaped to your hand. Here are some key benefits of breaking in your glove before game time:
- Comfort: Breaking in a glove makes it more comfortable to wear and catch. The formed pocket cradles the ball rather than smacking your hand.
- Control: A broken-in glove gives you better control when catching and fielding—the flexible, softened leather moves with your hand.
- Confidence: You can play confidently, knowing your glove is ready for action. A stiff glove can cause bobbled balls and errors.
- Longevity: Breaking in extends the life of your glove. Catching without breaking it in can damage the leather.
The bottom line is that breaking in improves performance and prolongs the life of your glove. Even professional players continue breaking their gloves throughout the season. The work you put in now will pay off the first time you snag a line drive!
How Long Does It Take to Break In a Glove?
The time it takes to break in a baseball glove entirely depends on several factors:
- Glove material – Higher quality leather, like whole grain, takes longer to break in than synthetic blends. Allow more time for high-end gloves.
- Glove position – Infielder gloves generally take less time than more giant outfielder gloves. Catcher’s mitts take the longest to break in.
- Break-in techniques – Using a mallet and glove steamer accelerates the break-in process. Manual working tends to take longer.
- Frequency of use – Gloves broken in for 30 mins daily break faster than occasional use. Consistency is key.
Most new gloves take two weeks and two months of consistent work to become entirely game-ready. High-quality full-grain leather gloves can take over a month with daily use. Be patient and keep at it until the glove feels like a natural extension of your hand.
7 Steps to Break in a Baseball Glove
Breaking in a baseball glove takes time, effort, and patience. Here are seven key steps to follow for optimal results:
1. Prepare the Glove
Before you get started, prepare your new glove for the break-in process:
- Remove tags or labels attached to the glove.
- Loosen up the laces slightly – this helps the leather become more flexible.
- Rub glove oil or conditioner into the inside and outside of the glove. This prevents the leather from drying out.
Preparing the glove properly will help it soften up quicker.
2. Create the Pocket
The pocket is the web between your thumb and forefinger that cradles the ball during catching. Start shaping the pocket by pushing your fingers into the webbing and massaging it back and forth.
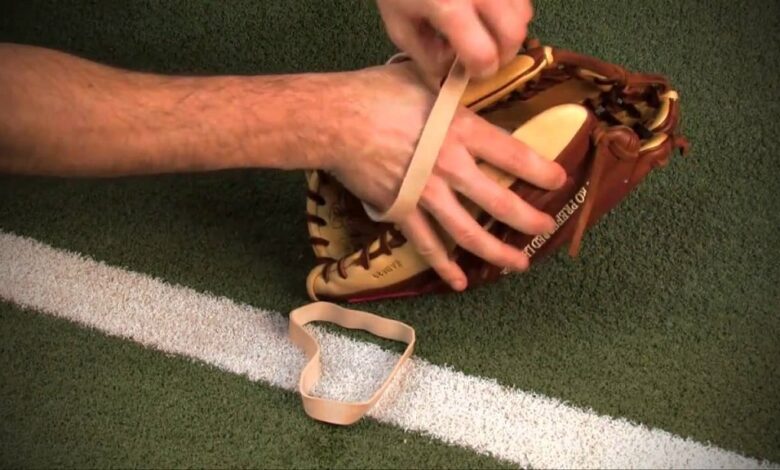
Place a baseball in the pocket and tie it off with rubber bands or shoelaces to hold its shape overnight. Repeating this will form the deep pocket you need to catch balls securely.
3. Use Your Hands
One of the simplest break-in methods is working the glove with your bare hands:
- Massage and squeeze every part of the glove to loosen and soften the leather. Pay extra attention to tight spots.
- Open and close the glove repeatedly to create natural creases.
- Push your fingers against the palm to form the pocket.
- Gently pull the pinky and thumb areas to widen the opening.
Take the glove everywhere and use downtime to work in the leather manually.
4. Use a Mallet
A rubber mallet is a highly effective way to soften tough new gloves.
- Place the glove palm-down on a hard, flat surface.
- Gently tap the entire glove, especially tight spots, with the mallet. This helps loosen the leather fibers.
- Cushion the mallet with a towel to prevent damaging the glove.
- Continue hammering until the glove leather compresses easily.
Be patient and tap lightly during this step of the process.
5. Condition the Glove
As you work the glove, regularly apply leather conditioner inside and out. Pull the conditioner through the webbing as well.
The conditioner keeps the leather supple to enhance forming. It also prevents the glove from drying out or cracking.
Use glove oil or a leather conditioner explicitly made for sports equipment. Apply it daily during the break-in period.
6. Play Catch
Once the shaping is underway, start playing Catch with the glove at short distances.
- Toss lightly with a partner about 30 feet apart. This starts flexing the glove and forms the pocket.
- Slowly move apart over multiple sessions until you can comfortably catch throws from 60+ feet.
- If you feel resistance, keep working the glove by hand before playing Catch.
- Wear your glove around the house to continue forming.
Playing catch is vital to completing the custom shaping of your new glove.
7. Maintain the Glove
Your glove will continue forming as you use it on the field. But the break-in process doesn’t end after the first game!
- Apply glove oil weekly when in use to prevent drying and stiffening.
- Periodically remold tighter spots by hand as needed.
- Store your glove properly after games to maintain its shape.
Proper glove maintenance keeps the leather flexible game after game, season after season.
Patience and persistence through each step are crucial. But the effort pays off the first time you snag a line drive!
Tips for Effective Break-in Techniques
Keep these tips in mind to master the art of breaking in a baseball glove:
- Work on tight spots diligently – these often need extra attention.
- Only apply external heat briefly – too much can damage the leather.
- Knock the glove against your leg or a wall to loosen stiffness.
- Wear it around the house to enhance forming through regular hand movements.
- Always thoroughly air dry the glove after applying the conditioner before use.
- Use gloves with balls or towels to hold shape between sessions.
Take time, be consistent, and use proper techniques for the best results. The effort will be worth it come game day!
Useful Tools and Products
Having the right tools and products for breaking your baseball glove makes the process easier. Here are some helpful items to have on hand:
- Glove oil or leather conditioner – Keeps leather flexible and conditioned. Apply daily.
- A rubber mallet – Speeds up break-in time by loosening leather fibers. Use with caution.
- Glove steamer – Heats and softens leather quickly. Use for short bursts only.
- Ball/towel – Place inside the glove to hold the pocket and overall shape.
- Shoelaces/rubber bands – Tie these tightly around a ball in the pocket to set form.
- Wooden glove shaper – Slide hand into a formed mold to maintain pocket and width.
Investing in critical tools will give you an advantage during the glove break-in grind.
Break-In Tips by Glove Position
Certain glove positions require focusing break-in techniques on critical areas. Use these tips for specific fielding gloves:
Catcher’s Mitt
- Work the lower palm area by squeezing repeatedly to shape.
- Hammer the mitt firmly with a mallet to soften the padding.
- The wide receiver’s gloves help form the round pocket.
- Wear it frequently around the house to get the flex just right.
Infielder’s Glove
- Create a shallow, wide pocket by repeatedly catching balls or a rounded shaper.
- Use your glove hand to pound the pocket while holding a ball.
- Loosen fingers and break-in creases by opening and closing often.
- Flatten the palm with a mallet to enhance responsiveness.
Outfielder’s Glove
- Maintain a wide, shallow pocket using more petite balls like tennis balls.
- Hammer the edges and pinky side aggressively with a mallet.
- Use both hands to work in tightness around the thumb and pinky.
- Soften the extended palm by kneading vigorously with a fist.
Take your specific position’s needs into account when breaking in your glove.
Frequently Asked Questions
Here are answers to some common questions about breaking in baseball gloves:
How often should I apply conditioner during break-in?
Apply glove conditioner or oil at least every other day during the break-in period, inside and out. For quicker forming, daily conditioning is ideal.
Can I use shaving cream to soften my glove?
No, shaving cream can dry out and damage the leather. Use only glove conditioners made specifically for sports gloves.
How can I soften a stiff new glove quickly?
Using an electrical glove steamer and rubber mallet together will dramatically soften even the stiffest leather glove for accelerated break-in.
Should I apply external heat to my glove?
Minimal external heat like a steamer, hair dryer, or oven on warm can help initially but don’t overdo it. Excessive heat can damage and shrink leather.
How tight should my new glove laces be?
The laces should be gently snugged up but not super tight. Keeping laces moderately loose allows the glove to flex and form properly during break-in.
Conclusion
You can transform a stiff new glove into a game-ready companion with consistent, patient effort using proven break-in techniques. While it takes some work up front, the payoff comes the first time you smoothly field a grounder or snag a line drive thanks to a perfectly broken-in glove. Sticking to the process, conditioning the leather, Explore Now How Many Clubs in a Golf Bag? and letting the glove form around your playing style. In no time, your glove will become a trusted extension of your hand and help take your fielding to the next level.